Friday, November 7, 2008

Pandan Kaya Fudge Cake


This Pandan Kaya Fudge Cake was a rave in Malaysia in 90's and i don't know if it is still a star attraction in the bakeries. This tropical harmony of coconut and agar agar makes this a sweet treat that tastes like jello but cuts like a cake. This cake will cause oohs and aahs the minute it is presented and will immediately bring smiles on the first bite.


Ingredients:

For Pandan Chiffon Cake:

A:
4 egg yolks
90g castor sugar
160g all-purpose flour, sifted
1/2 tsp baking powder, sift with flour
1/2 tsp baking soda, sift with flour
100 ml water
1 tsp pandan essence
50g corn oil

B:
4 egg whites
60g sugar
1/4 tsp cream of tartar

Pandan Kaya:
900 ml. Coconut milk (i use Savoy Coconut Cream)
9 Tbsp. Hoen kwee flour / green pea flour
1 Tbsp. agar agar powder
1/2 tsp. salt
a little green colouring
a little pandan paste
180 gm. sugar
60 gm. Dessicated coconut for covering cake

Method:

To prepare pandan chiffon cake:

Add all ingredients in (A) and mix well until the mixture is smooth and consistent.

Whip egg whites and cream of tartar of Ingredients B at medium speed until the egg whites are bubbly. Add sugar and whip at high speed until stiff form but not dry.

Fold 1/3 of whipped egg whites into mixture of Step 1. Then, pour this mixture to the remaining egg whites in the other mixing bowl. Fold lightly to combine both mixtures.

Pour this combined mixture into a ungreased 9-inch round cake pan(i lined the cake tin with aluminium foil).
Bake at a preheated over at 350 deg F for 40-45 minutes.

As soon as the cake is removed from oven, quickly invert the pan and let it cool. (i invert cake on to a cake rack and place cake rack on top of a colander)

When the cake is completely cool, run a knife around the sides of pan to remove the cake(i remove the foil and tear it carefully).
Slice cake into 3 layers.(Remove the brown layer from the top of cake - that was what i forgot to do)

Method for pandan Kaya:
(1) Put all the ingredients into a pot and stir till evenly mixed.
(2) Cook over medium heat till mixture thickens and smooth. Cool slightly before using. Make sure it is still in pouring consistency.
(3) Place a slice of sponge cake into a cake ring, pour in some kaya and continue the same process till the last layer is covered with pandan kaya. Press slightly after layering the cake onto the kaya and make sure that the kaya fills the sides on the last layer.
(4) Leave aside to cool and set before chilling in the fridge.
(5) Remove cake from cake ring and cover the whole cake with dessicated coconut. If you are using an ordinary cake pan, line the cake tin before putting in the first layer of cake and when removing cake, introduce air in by folding 3 or 4 strips of paper and slipped them to the side of cake. Cake will then dislodged easily.
(6) Serve chilled.


Thursday, November 6, 2008

Sore Throat Cure


I have my daughter, Sharon to thank for forwarding this article to me as soon as she heard that i am down with a cold. It is flu season here and everyone is advised to get the flu shots - so lined up with the rest of the population to get a jab. It is the 'herd mentality' in me that says, if everyone is having a jab, i better have one. After reading the article below and 'What most doctors won't tell you about colds and flus', i would like to share them with all my readers. No co-pay and prescriptions - just what you have in the pantry and the tap in your kitchen sink.


Ingredients:


Salt


Warm Water


Method:


How to Prevent a Sore Throat from Progressing to a Cold
By Dr. Ben Kim on March 09, 2008


Before I share a great little tip on how to stop a sore throat from progressing into a week-long cold, please know that periodically experiencing a cold or the flu can actually be helpful to your health. If you have no idea why this is, please view the following popular article that I wrote on this topic:
What Most Doctors Won't Tell You About Colds and Flus


You just won't get this information on why colds and flus can help you stay healthy over the long run from medical textbooks and mainstream media - please consider sharing it with family and friends.


Although experiencing a cold or the flu once in a while can help rid your body of your weakest cells, I'm willing to bet that there are times when you would really prefer to delay such a period of cleansing and malaise.


Here's how you can stand a good chance of preventing a cold from developing:


As soon as you experience that sore, tickly feeling in your throat that precedes a full-blown cold, gargle with warm salt water.


And when I say gargle, I mean really gargle; take in a mouthful of warm salt water, look up at the ceiling, and gargle aggressively. You may want to tap at your throat (the Adam's apple region) with your fingers while you gargle to encourage the warm salt water to trickle deeply into your throat.


Gargle like this several times with a glass of warm salt water, and repeat as often as possible throughout the day.


Warm salt water can remove viruses from the tonsils and adenoids that line the back of your throat region. Viruses that cause colds and flus typically get caught by your tonsils and adenoids before they spread through your body. Your tonsils and adenoids are important parts of your immune system because they are located near the entrance of your breathing passages, and they serve as a first line of defense against undesirable airborne microorganisms and substances.
This, by the way, is why it is best not to remove tonsils and adenoids from your throat region. Chronic swelling of tonsils and adenoids is best addressed by reducing sugar intake, adopting a minimally processed diet that is rich in fresh plant foods, and supporting immune system health by getting plenty of rest, exercise, and exposure to sunlight and fresh air.


Cold salt water may also help to remove viruses from your tonsils and adenoids, but warm salt water tends to be more effective. Warm water may help to melt the fatty coating that protects viruses that cause the cold and flu.


What if you gargle for all you're worth but still end up developing a full-blown cold?


Get lots of rest, drink plenty of fluids, and take comfort in knowing that countless viruses are at work destroying your weakest cells. And don't forget to blow your nose as often as it runs; help your body get rid of what it wants to get rid of.


Wednesday, November 5, 2008

Black Peppered Beef Udon


This japanese style noodle - Udon is not only good for soup, fry it this way and you not go back to having it in soup. I have used udon to cook the Kuala Lumpur Hokkien Mee and it is so much better than the noodles i made.


Ingredients:

3 pkts 7.20 oz japanese style noodles - Udon
1/2 lb Beef fillet/sirlion - slice thinly across the grain
4 - 5 slices ginger
1/2 cup chopped chinese celery

Oil for frying beef and noodle

Marinate

1/2 tsp bicarbonate of soda
1/2 tsp sugar
1 tsp light soya sauce
1 tsp dark soya sauce
1/2 egg white
1 tbsp oyster sauce
1 tbsp shaoxing wine
1 tsp sesame oil
1 tbsp tapioca starch
2 tbsp water
2 tsp cooking oil

Gravy

11/2 tbsp black pepper - freshly ground
3 tbsp oyster sauce
1 cup chicken stock
1 tbsp cornstarch

Method:

Knead the marinate except the oil, thoroughly into the sliced beef and when well mixed, add in the oil and knead again. Leave to marinate in the fridge for 30 minutes.

Heat a pot of water and when water comes to a boil, put in the udon and turn off the heat. Let the udon sit in the hot water to keep warm.

Heat 1 cup oil and when it is hot, fry the beef by batches. Fry beef until 3/4 cooked.
Remove all the oil and leave 2 tbsp. Fry the ginger slices, then add in the warm udon and beef.

Stir fry, then add in the gravy ingredients. Cook until gravy thickens and add in the chinese celery.

Serve hot.


Serves


Tuesday, November 4, 2008

Abacus Beads/Sueen Poon Chee


I love anything cooked with taro and this dish is one of my favorites, perhaps it's in my genes . This traditional Hakka dish is eaten during festive celebrations such as Chinese New Year, Dragon Boat Festival and the Mid-Autumn Festival for prosperity. sueen poon chee, or abacus seeds, are springy discs of yam, shaped after its namesake. I have tried many times trying to get the springiness by adjusting the ratio of yam to tapioca starch. I like more springy and have to sacrifice the taste of yam by using more tapioca starch. For this dish, the ingredients cooked with this abacus seeds have to be very flavorful.

Ingredients:

1 lb taro, cleaned, peeled and thinly sliced(i used frozen ones, thaw and slice)
12 ozs tapioca starch
3 tbsp cooking oil
5 cloves garlic, peeled and sliced
1/4 cup dried shrimp, soak and coarsely chopped
11/4 cup shredded dried squid - soak
6 dried Chinese mushroom, soaked till soft and sliced
1/2 lb ground pork
1/4 lb chinese chives - cut into 1 inch in length
1 tsp pepper
1 tsp fish sauce
1 tsp oyster sauce
1/2 cup chicken stock

Method:

Steam taro until soft and mash.
Place the tapioca starch in a large mixing bowl and add hot taro paste to it, stirring it in well
When the taro and starch mixture has cooled , knead it to form a dough.
Pinch off enough dough to roll into a ball , 1 inch in diameter. Press the ball between your thumb and forefinger so that it is depressed in the middle and shaped like an abacus seed.
Repeat until dough is used up.
Fill a pot with water to the three-quarter mark and bring it to a boil.
Place abacus seeds in the pot and cook, stirring occasionally to prevent the seeds from sticking to the bottom of the pot. When cooked, the seeds will float to the top. Scoop out the cooked abacus seeds and leave them aside to drain.
To a hot wok, add 2 tbsp oil and fry the garlic till golden brown before adding dried shrimp, shredded dried squid and mushroom. Stir fry the mixture , then set aside.

Add the remaining tbsp oil to the hot wok and fry the ground pork until it is cooked and no more pink.
Add in the cooked garlic, dried shrimp, shredded dried squid, mushroom, abacus seeds and the seasonings.
Add in the chinese chives and stir briefly.
Dish out and sprinkle with sesame oil.
Serve hot.

Serves

Monday, November 3, 2008

Snow Pea Shoots with Oyster Sauce


When you order this dish at the chinese restaurant, it will cost you an arm and a leg for a tiny plate but dishing it at home only cost you an arm but you can enjoy 3 servings of what you get in the restaurant. It is an easy dish to cook, the only difficult part is to plucking the young shoots and discarding the woody ones.


Ingredients:
1 lb Snow Pea shoots - use only the young shoots - wash and drain
2 tbsp oyster sauce
3 - 4 tbsp garlic oil

Method:
Put drained snow pea shoots on to a large plate.
Pour the garlic oil over the snow pea shoots, cover with splatter cover and microwave on high for 3 minutes.
Remove splatter cover and add in oyster sauce.
Serve hot.


Serves

Sunday, November 2, 2008

Dry Chicken Curry


This curry is one of the least tedious to prepare, all you need to do is to chop a big onion and some very ripe tomatoes and better still, just open a can of diced tomatoes. Not only is it easy, it is healthy, no coconut milk is involved.
This summer, i planted only 2 tomato plants but had so many fruits. The family had to eat tomato everything.


Ingredients:
4 chicken legs - cut into bite size and seasoned with salt and pepper
1 big onion - chopped
1/2 inch ginger - grated with microplane or minced
4 cloves garlic - minced
2 heaped tablespoons curry powder
1 can of diced tomato/1 1/2 cups overriped tomato - chopped
1 cup mint/cilantro - chopped
1 cinnamon stick
5 - 6 cardomons - cruched
5 - 6 cloves
Salt and pepper to taste
Oil

Method:
Brown chicken pieces and leave aside.
Add more oil and add in cinnamon stick, cardomons and cloves. Fry in medium heat until the cinnamon stick opens up.
Add in the chopped onions. Sprinkle a pinch of salt and fry until slightly limp, then add ginger and garlic. Saute well, then add in curry powder.
When curry mixture is fragrant, add the browned chicken pieces , the chopped tomato and the mint/cilantro. 2 fresh red jalapeno/chillies can be added for more spicy curry.
Cover pan with lid and cook until chicken pieces are cooked. - Stir now and then to prevent burning.
Cook the curry until it is very dry, stirring all the time.
Adjust the taste with salt and pepper.

Serves

Saturday, November 1, 2008

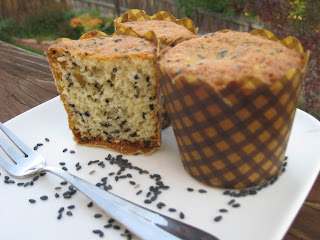
Black Sesame Seeds Cake

As most of you know, i am in the Mile High City, Denver which is 5,280 ft above sea level and with high altitude, my bakings behave strangely and the recipe has to be altered otherwise it will be offerings to the Culinary God. I have specify the ingredients in brackets for all friends who reside at sea level. Happy baking and do try this fusion , western cake with eastern flavor - sesame.


Ingredients:
1 3/4 cups flour(1 1/2 cups for sea level)
1/4 teaspoon baking soda(1/2 tsp for sea level)
1/4 teaspoon baking powder
1/4 teaspoon salt
2 large eggs, room temperature
2 1/2 teaspoons toasted sesame oil
1 teaspoon vanilla extract
8 tablespoons butter, room temperature
3/4 cup sugar(1 cup sugar for sea level)
1/2 cup buttermilk, room temperature
1/4 cup toasted black sesame seeds

Method:

Preheat the oven to 350 degrees F. Grease the bottom and sides of a 8 inch cake pan or a springform pan or line muffin pan with paper cups -
Combine the flour, baking soda, baking powder, and salt together in a bowl and set aside.

Beat the eggs together in a bowl with a whisk. Add the sesame oil and vanilla and thoroughly combine.

Place the butter in the bowl of a stand mixer and beat with the paddle attachment on medium for a few minutes to soften it up. Add the sugar and beat for several more minutes until it is light-colored and fluffy.

Add in the egg mixture a little at a time while the mixer is still running, letting it slowly combine over a couple of minutes.

Stop the mixer and pour in a third of the flour mixture, and beat just until combined. Scrape down the sides as necessary.

Add half the buttermilk and beat until combined.

Repeat with half of the remaining flour mixture, the rest of the buttermilk, and finally the rest of the flour mixture with the sesame seeds. With each addition, beat it only until it is just incorporated.

Scrape the batter into the prepared pan and bake in the oven for about 30-40 minutes, 20 - 25 minutes for muffin pan, until the top is golden brown and a toothpick inserted into the center comes out clean.

Let the cupcakes cool on the rack .
If you baked the cake in a regular cake pan, invert it onto the rack, and turn it right side up to finish cooling.

This cake will keep in an airtight container for up to 4 days.


Serves