This dish is from the Chinese migratory Hakka dialect group and is several hundred years old. The Hakkas, especially this sub-group called Ho Poh , have a unique tradition regarding this dish as medicinal, a detox meal which is also reputed to boost metabolism and servet his supersalad, with 7 types of vegetables, on the seventh day of Chinese New Year just like the cantonese tradition of serving Yee Sang which most chinese are accustomed to.

Ham Cha Farn(salty tea), Looi Cha Farn(ground tea) or Thunder Rice, has a lot of variations. The tea used ,be it green or black signifies and determine the flavour and taste of the dish. It is sometimes kept simple by grinding the tea, add salt to taste and hot boiling water, to make a broth. However others may add roasted peanuts, sesame seeds or both together with the tea leaves and herbs like mint, basil, perilla and saw coriander, in the grinding process to make into an almost medicinal tea broth. This alters the flavour of the dish significantly. The taste however, is not for everyone. Some find it enervating and refreshing, others do not like the bitter or strong herbal notes.

The essential ingredients are Farn(Cooked Rice), which can be puffed rice (mee chang) or rice grains fried with garlic and a little oil, prior to cooking and three of the seven ingredients which will determine a good Ham Cha Farn/Looi Cha Farn are dried shrimps, choy poh(preserved radish) and firm tofu. These three are to be sauted and seasoned with sugar and white pepper..
To complement the tea and rice, a wide variety of carefully selected vegetables (including blanched long beans, cabbage, carrots, four-angled beans, chye sim, celery, are used. It should be noted that meat and fish is seldom added to this diah as the the main idea is to eat lots of vegetables, making this dish cheap, hearty , nutritious and a fibre-rich.
Continue for recipe HERE

Ingredients:
8 cups/2.2 lbs/1 kg long grain white glutinous rice
1 pc wine yeast (bigger kind brought from Malaysia)
1 pc wine yeast (small kind available in any asian stores here in the States)
1 cup red rice yeast (also available in the asian stores here)
2 cups filtered water for sprinkling.
Method:
Wash the glutinous rice, drain, and place in rice cooker with enough water to cover the surface(it is just like cooking regular jasmine rice). Put to cook, and when rice is cooked, remove from the rice cooker, then spread it onto foil covered baking sheets and leave to cool completely.(make sure new foil is used to cover the baking sheets) Rice must be completely cold before use.
Using a clean coffee grinder, grind the wine yeast and red rice yeast into powder.
To assemble:
Sprinkle a little wine yeast mixture on to a crockpot and then layer with rice(wet hands with the filtered water and flatten a handful and use it for layering).
Sprinkle with more rice yeast all over the rice and then sprinkle with the filtered water.
Repeat the layering - rice, rice yeast and water until all the rice is done.
Lastly pour the remainder of the filtered water.
Cover crockpot with a clean cloth and then the lid.
Leave it to ferment for 7 days, then open lid and give mixture a good stir with a clean wooden spoon.
Cover crockpot with the clean cloth and lid and leave to brew for another 14 days(the total brewing time is 21 days - if you prefer a stronger alcoholic wine leave for another 7 days).
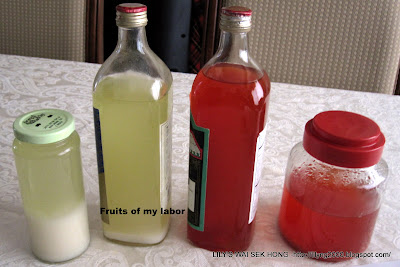
Wine can be harvested on the 21st or 30th day.
Prepare a sieve or a colander and line it with a clean cloth. Put it over a pot to catch the wine.
Put the brewed wine mixture onto the cloth and let the wine dripped.(patience in letting the wine drip slowly will result in very clear wine).
When all the wine has dripped and the residue is quite dry, remove the residue and store it in a jar or air tight container for many more other recipes.
Bring the wine to a quick boil (my wine started to boil at 180f and of course it is cos i am one mile above sea-level)
Let the wine cool before bottling.
Wine is now to be enjoyed in any way you wish.
Serves
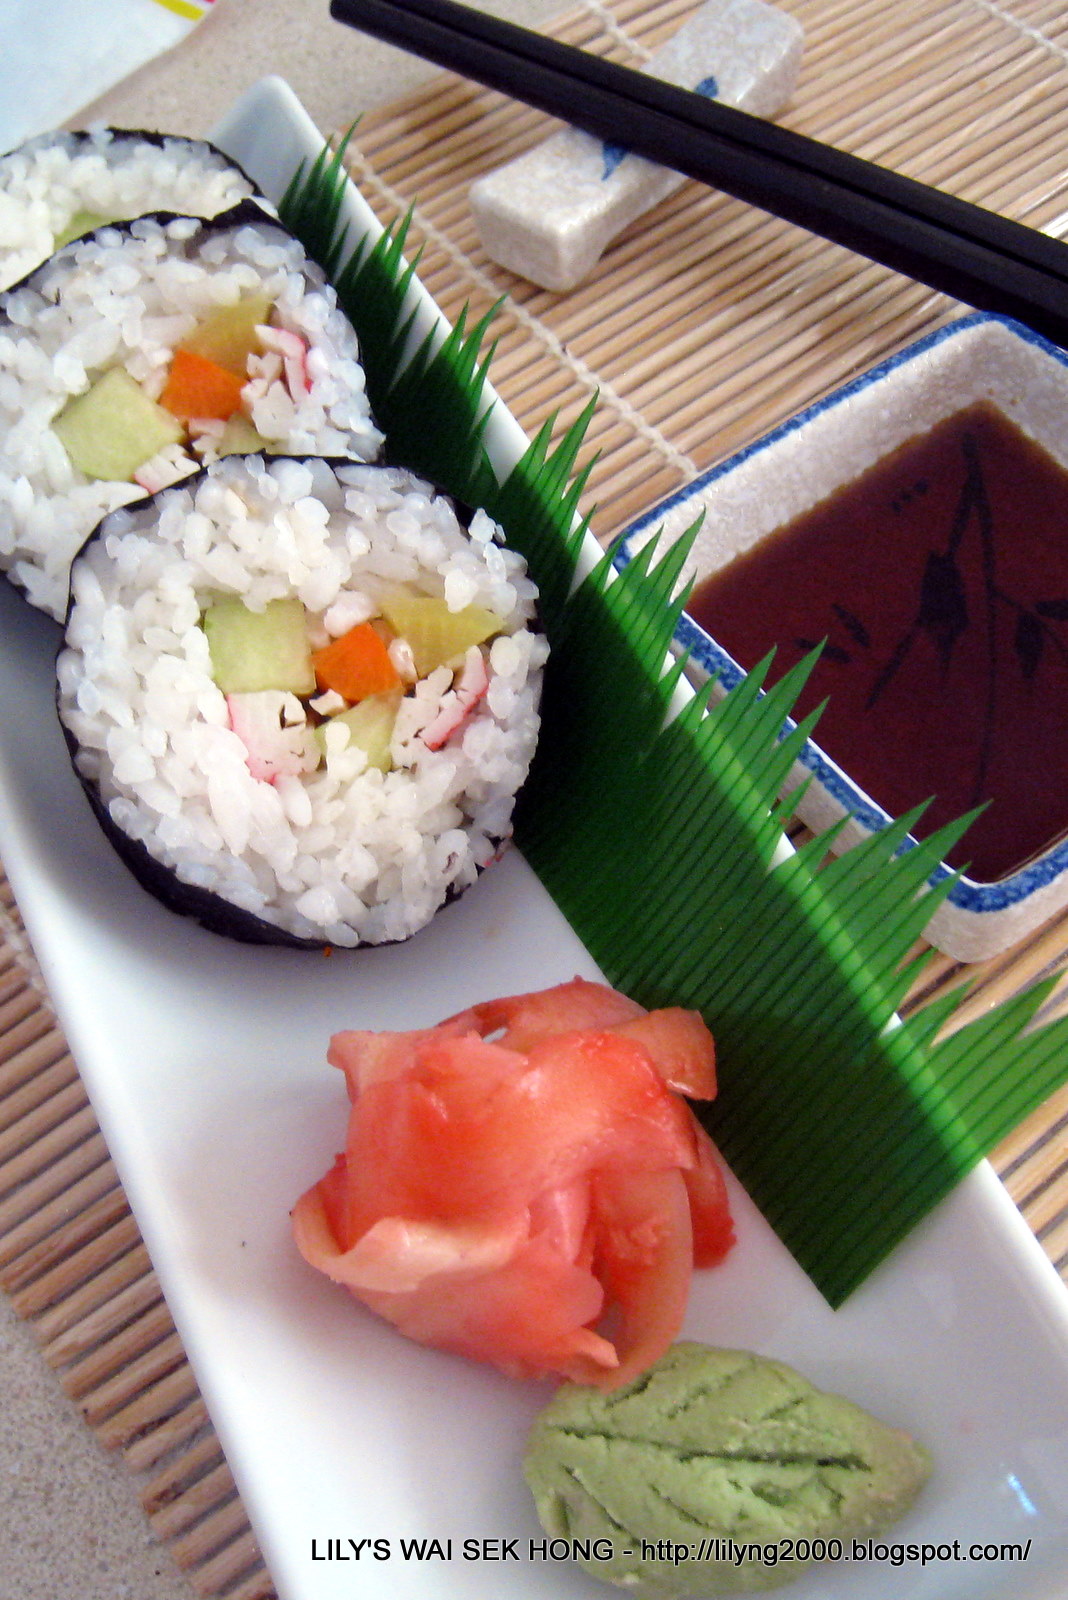
Futomaki are thick sushi rolls which includes various fillings. They are also known as fat rolls. My friend Sam who is a Sushi Chef told me that it is easy to make Sushi. All i needed was some goodwill and a good guide, meaning that he will show me how. Looking at his nimble fingers working with the rice, trying not to blink in case i missed some valuable tips, but i must have blinked, cos the roll was ready right before me, like magic, my mouth was opened wide with astonishment. I insisted that he would have to roll on slow motion and this time, he went extra slow, so i had more ideas of how a good sushi roll was done. Then it was my turn, i was so excited that i forgot all the tips and made a huge mess. Our hungry friends could not wait for lunch, so Sam had to continue making lunch for us and i promised him that i will go home and try to remember his teaching and not make a mess. You think that i will remember? I did keep my promise , i made some and a mess too.
Sushi Rice:
Ingredients:
2 cups sushi or short grain rice
2 cups water, plus extra for rinsing rice
2 tbsp rice vinegar
2 tbsp sugar
1 tbsp kosher salt or 2 tsp regular table salt
Method:
Place the rice into a mixing bowl and cover with cool water. Swirl the rice in the water, pour off and repeat 2 to 3 times or until the water is clear. Pour enough water to cover rice and let it soak for 30 minutes.
Place the rice and 2 cups of water into the rice cooker and cook rice until done.
Combine the rice vinegar, sugar and salt in a small bowl and heat in the microwave on high for 30 to 45 seconds.
Transfer the rice into a large wooden or glass mixing bowl and add the vinegar mixture. Fold thoroughly to combine and coat each grain of rice with the mixture. Allow to cool to room temperature before using to make sushi
California Roll
Ingredients:
Juice of 1/2 lemon
1 medium avocado, peeled, pitted, and sliced into 1/4-inch thick pieces
4 sheets nori
1/2 batch sushi rice, recipe as above
1 small cucumber, peeled, seeded, and cut into matchstick-size pieces
4 crabsticks, torn into pieces
Pickled ginger, for serving
Wasabi, for serving
Soy sauce, for serving
Method:
Squeeze the lemon juice over the avocado to prevent browning.
Cover a bamboo rolling mat with plastic wrap.
Lay 1 sheet of nori, shiny side down, on the plastic covered mat.
Wet your fingers with water and spread about 1 cup of the rice evenly onto the nori.
Place 1/8 of the cucumber, avocado and crab sticks in the center of the sheet.
Grab the edge of the mat closest to you, keeping the fillings in place with your fingers, and roll it into a tight cylinder, using the mat to shape the cylinder. Pull away the mat and set aside. Cover with a damp cloth.
Repeat until all of the rice has been used. Cut each roll into 6 pieces.
Serve with pickled ginger, wasabi and soy sauce.

Ingredients:
5 cups cooked sushi rice/jasmine rice, room temperature
5 sheets nori, cut in half lengthwise
1 (12 oz.) can Spam
Furikake(optional), to taste
Sauce:
6 tbsp soy sauce
4 tbsp mirin
4 tbsp sugar
Method:Cut Spam into 10 slices. Fry until slightly crispy. Remove and drain on plate lined with paper towels.
To make the sauce, in another pan, combine soy sauce, mirin and sugar. Bring to a boil over medium-high heat, then reduce to low. Add Spam slices, coating them in the mixture. When mixture has thickened, remove Spam from pan.
To assemble, lay a sheet of nori lengthwise on a clean surface. Moisten lower half of musubi mould and place on lower third of nori. Fill musubi mould with rice and press rics flat until the rice is 3/4-inch high(this height is desirable but it does not matter, if you have put in more rice, then the height will be taller - no rocket science). Sprinkle rice with furikake if using. Top with slice of Spam. Remove musubi mould with the press still on top of Spam, keep in a bowl of warm water to keep it clean and moist.
Starting at the end towards you, remove the press and fold nori over Spam and rice stack, and keep rolling until completely wrapped in the nori. Slightly dampen the end of the nori to seal it.
Repeat with the other nine Spam slices, making sure to rinse off musubi maker after each use to prevent it from getting too sticky.
This 'kuih' is typically 'hokkien' and it is time that i talk about my heritage as hokkien 'lang' after being branded as a 'macau sai' by my paternal grandmother cos me and my siblings do not speak our 'mother tongue' that well or rather not at all. We spoke our Mother's tongue, cantonese, but it should not be our Mother's tongue but my Grandma's - Ah Po, who is cantonese. There was once when i was asked by my Ah Ma to tell this hokkien guy who came to look for my Ah Kong - 'ie kee liao pee la lui lee eh au pit' - hokkien guy seemed to understand what i said, while i myself took a long time to figure out what i said. Can any of my 'hokkian lang' readers tell me what i said?. This kuih is a speciality and will appear on the table of hokkien families during hokkien festivals. My one and only Ah Koh, made the best tee nyah kuih and i would like my Ah Ma and Ah Koh to be proud of me by making this kuih although mine is not as good.
Ingredients:
1 lb rice flour
2 tbsps tapioca flour
1/2 tsp borax/ pang sar (optional)
2 tbsps potassium carbonate & sodium bi-carbonate solution
2000 ml/2 liters water
1 ½ tbsps cooking oil
1 tsp salt
Method:
Combine rice flour, tapioca flour, borax, potassium carbonate & sodium bi-carbonate solution, salt together in a microwave-safe bowl. . Add in the water, a little at a time, to prevent lumps. Give it a good mix before adding cooking oil and stir well and make sure borax is dissolved.
Cook in the microwave until a very thick consistency, stirring after every intervals.
Pour in a greased 9 inches round steaming tray and spoon the 2 tablespoons of tap water over surface of kuih.
Steam kuih over rapidly boiling water for one hour. Replenish water if necessary. To prevent condensation, wrap steamer cover with a large piece of cloth(using a bamboo steamer is the best).
Test for doneness with a wooden skewer(lidi) pierced in the centre, It should come out clean.
Cool kuih for a couple of hours before slicing.
Serve with Hong Bak or Red Cooked Pork or Tau Yue Bak
Serves
I have cooked nasi biryani many times and somehow, this chinese lady is not getting it right. My nasi biryani did not have the indian or malay umph and more often than not, the rice was not totally cooked through according the method provided in most recipes, and i have to resolve by using the microwave to finish the cooking. But, nowadays, cooking nasi biryani is no more a problem, thanks to Vivien Tan, one of my readers who have become a dear friend, send me a few packets of 'SHAN" brand for biryani . I followed the instructions on the back of the packet and my biryani rice have always been cooked through and the nasi was spicy, with all the umphs. I find the taste to be slightly too salty so i reduced the amount of salt recommended to 1 tablespoon, when i was cooking the rice. Thank you Vivien for sending me the Shan premixed, they are available now here in our indian stores.
Ingredients:
1 1/2 lbs chicken pieces
1 1/3 lb basmati rice - soaked for 30 minutes and drained
1 tbsp tamarind pulp - soaked in 1 cup water for 30 minutes, Then press and sieve the juice.
2 - 3 medium onion - sliced(about 1/2 lb)
2 tbsp grated ginger
2 tbsp chopped garlic
1 cup cooking oil
1 packet 'Shan' Malay Chicken Biryani
Rasins
Fried shallots
Toasted cashew nuts
Cilantro for garnishing
Method:
Marinate chicken pieces with ginger, garlic and 2 tbsp of Shan Malay Chicken Biryani mix for 1 hour.
Heat oil and brown the marinated chicken pieces. Remove and set aside.
Sweat the chopped onions, then add in browned chicken pieces, the rest of the Shan Malay Chicken Biryani mix, tamarind juice and 1 cup water. Continue to cook and stir until sauce is thickened. Set aside.
Boil 10 cups of water with 1 tbsp salt and add in the soaked rice. Boil until the rice is three-quarter tender. Drain the liquid.
Assembling the Biryani:
Spread the cooked chicken pieces and the drained rice in layers into the rice cooker.
Top with raisins, then cover and press the cook function and cook until rice is cooked through.
Slightly mix the rice and chicken pieces and garnish with cashew nuts and fried shallots before serving.
Serves